The reasons to leave the lease sticks in
There are good reasons to leave the lease sticks in during weaving but you may be reluctant to do it because you’ve had difficulty before. As a first step, try leaving the raddle lease sticks in place during weaving (you’ll have to leave them in while beaming). See for yourself the advantage of finding and repairing broken warp threads quickly and, perhaps, some of the other advantages. Then you have almost convinced yourself to leave the thread-by-thread lease sticks in, which is your next step!
- They greatly speed up repair and weaving when warp threads break. See below.
- They separate warp ends that might twist around each other.
- They allow you to feel any twists in the warp threads so you can delicately work them out before breakage or tension problems happen.
- They are the lease for tying on new warp threads precisely in order.
- They are not there to even out the warp tension as you may have learned.
How to weave with lease sticks in the warp
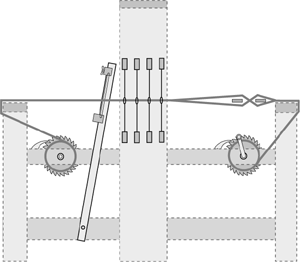
If you like, you can anchor the lease sticks to the back beam with something flexible like rubber bands or springs. Simply tying the sticks in place could possibly cause broken ends, especially if the sticks are rigid rather than flexible. Put them as far back as you can.
I usually let them advance with the warp during weaving and push them back periodically during pauses. I don’t mind doing this because it gives me a chance to feel if there are any twists developing that need to be worked back toward the back beam. When you forget to do this, the sticks move up close to the heddles and prevent the warp threads from separating to make the sheds. When there are twists between the warp beam and the lease sticks I work them back during the pauses. If this seems a chore to you, just anchor the lease sticks at the back of the loom as above.
Normally, the lease sticks are positioned between the shafts and the back beam. However, if there isn’t room for them there without impeding the sheds, try putting the lease sticks between the back beam and the warp beam. This can work with sturdy warp threads. Because the threads are under tension, they will pass through the sticks without harm.
When it is better to remove the lease sticks
They must be removed if there isn’t room for them behind the castle without impeding the sheds. They must be removed if there are too many twists in the raddle groups and it is impossible to push back the sticks as they approach the heddles. (See twists, below.) Remove them if your lease sticks are bulky and the warp is narrow and they are tipsy and frustrating. Before giving up altogether on the sticks though, I suggest you use thin lease sticks and try tying each stick separately (see figure below). Try to work the sticks back independently, one at a time. Otherwise, try leaving the raddle lease sticks in for a warp or two as I mentioned above.

How lease sticks speed the repair of broken warp threads
A big job the lease sticks do so often during weaving is help you find and repair broken ends faster. Having the lease always at the ready greatly simplifies the process and lessens the frustration of stopping to make repairs. With the sticks in place you can easily find the broken end and trace its position through the lease to see exactly where it belongs on the warp beam, in the heddles, or in the reed. This is a lot faster than hunting in the shafts for the empty, hard-to-find heddle, especially with very fine threads and many shafts. If you don’t find the exact position in the lease when you repair a thread, you get crossed warp threads behind the heddles which can make tangles in the warp.
When a break occurs I separate the threads on either side of the broken end at the lease and follow the thread directly to the heddles and reed.