This is a wall-hanging quilt I finished last Saturday using scrap fabric and leftover charm squares. This quilt makes for a perfect example of various and simple ways to machine quilt (e.g. for this small quilt, I machine quilted this via straight-stitching, stitch-in-the-ditch, echoing, free-motion quilting).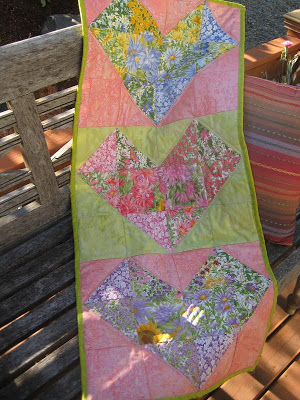 Here’s how the back looks like – you can really see the quilting in this lighting.
Stitch-in-the-Ditch: This is probably one of the easiest ways to quilt as it only involves straight lines. The placement of the stitch is in the pressed seams. In this photo I’m using a presser foot.
All you have to do is decide what shaped you want outlined (or stitched in the ditch), and then go for it. When deciding what shapes on your quilt top you want outlined, try to keep in mind how the back of the quilt will look.
Echoing: After stitching-in-the-ditch, I then echoed the heart with a straight stitch using a 1/4″ seam. Again, I used a presser foot.
Here’s how the back of one heart looked after outlining and echoing with a straight-stitch:
Straight-stitch: After outlining and echoing each heart, I quilted inside of each heart differently. For the first heart, I simply quilted symmetrical lines using a straigh-stitch with a presser foot. I started and ended each stitch with a back-stitch:
For the last heart, I quilted wavy-lines, still using a straight-stitch. I simply guided the quilt top in long, wavy motions underneath the presser foot.
Free-Motion Quilting: For the middle heart, I used a darning foot (picture below). Follow your sewing machine’s instructions to replace the presser foot with a darning foot. Also, you will need to cover the feed dogs on your sewing machine (there should be instructions in your machine’s manual for that too). With free-motion quilting, you have total control of the movement of fabric beneath the needle because the feed dogs on your sewing machine are covered. On the contrary, when using a regular presser foot for straight-stitching the feed dogs are exposed (which is why you should never pull the fabric when straight-stitching, simply guide the fabric through). Maintaining a constant sewing speed and fabric movement under the needle will help you sew even stitches. To secure a stitch, simply hold the fabric in place and sew several times in the same spot. This is basically the equivalent of doing a back stitch but with a darning foot. Do this when you start and end a stitch. When free-motion quilting, it helps to choose a continuous pattern (i.e. loopy-loops or swirls).
With the darning foot, I quilted free-motion stippling which is basically a bunch of squiggilies that never overlap (though i confess i messed up several times, you can see my mess-ups in the video below :-o). In this video I’m wearing what I call my Michael Jackson-Gloves, aka quilting gloves that have traction on the finger tips to help give me more control over the quilt top. You can get these at your local crafts shop; i can definitely tell the difference when i use them vs. not using them.
Here’s a mini video of me free-motion quilting with my MJ gloves 😉
Anyway, for those of you that have never machine quilted and are thinking about it, I hope this gives you some helpful insight. Feel free to post any questions and I’d be happy get back to you. I’m no machine quilting guru, but i’d be happy to try help!